Oct 30 2008

Create Flex Application with FlashDevelop

I’ve been having a lot of fun programming Flex and ActionScript applications since I have discovered FlashDevelop. In this article, I will go through the motions to create a simple Flex demo application based on the primordial Hello, World. To get started, download and install FlashDevelop. Once you have FlashDevelop installed and configured with the latest release of the Flex SDK you are all set to create Flex applications.

FlashDevelop is a very good IDE for ActionScript and Flex applications. It is simple to use and familiar if you have used visual Studio. It might be lacking a few features like design view mode, but it does come with really smart code assist out of the box.

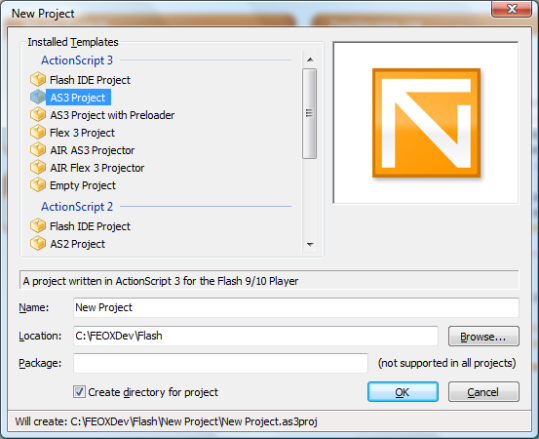
To get started create a new Flex 3 Project by clicking New Project from the Project menu.

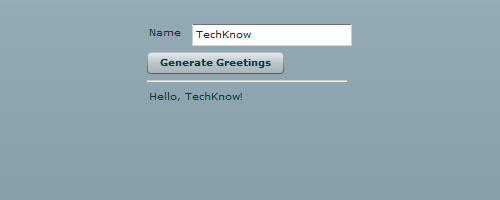
For our Hello Flex example we are going to add a text field where you can enter your name. Once you enter your name, you press a Generate Greetings button to output a personalized greetings in a label. To help us visualize the task at hand, here is a screenshot of the sample Flex application…

Hello, Flex

To layout out the text field, button, horizontal rule, and label components involved I will use the Grid container. Here is the MXML markup to create the above GUI.

<?xml version="1.0"?>
<mx:Application xmlns:mx="http://www.adobe.com/2006/mxml">
  <mx:Grid>
    <mx:GridRow >
      <mx:GridItem>
        <mx:Label text="Name"/>
      </mx:GridItem>
      <mx:GridItem>
        <mx:TextInput id="inputName"/>
      </mx:GridItem>
    </mx:GridRow>
    <mx:GridRow>
      <mx:GridItem colSpan="2">
        <mx:Button label="Generate Greetings"/>
      </mx:GridItem>
    </mx:GridRow>
    <mx:GridRow>
      <mx:GridItem colSpan="2">
        <mx:HRule width="200" />
      </mx:GridItem>
    </mx:GridRow>
    <mx:GridRow>
      <mx:GridItem colSpan="2">
        <mx:Label id="labelGreeting" />
      </mx:GridItem>
    </mx:GridRow>
  </mx:Grid>
</mx:Application>

The above MXML code will generate the GUI but at this point there will be no action taken when the Generate Greetings button is clicked. We first need to create a function that will execute when the button is pressed. Add the following ActionScript snippet right below the Application tag.

<mx:Script>
  <![CDATA[
    public function generateGreetings():void {
      labelGreeting.text = "Hello, " + inputName.text + "!";
    }
  ]]>
</mx:Script>

Notice that label identified as labelGreetings and the text input identified as inputName are referenced in the ActionScript code. Next, to get everything working we need to add the click event listner to the button. Modify the button to the following.

<mx:Button label="Generate Greetings" click="generateGreetings()" />

Hit F5 to build the project and execute, or open in your favorite browser, the index.html file under the bin.

Technorati Tags: , , , ,


Oct 28 2008

Silicon Valley Code Camp 2008

The Silicon Valley Code Camp is happening this year at Foothill College on Nov 8-9. There are over 100+ scheduled sessions lined up with nearly 1000 developer attending. Although you need to register, attending the Code Camp is free. Looking at the scheduled session, it will be a very diverse conference with talks on Open Source, Java, C#, and Web Development. Speakers include Douglas Crockford of Yahoo, Paul King of Groovy in Action, Bill Venners of Artima, Arun Gupta of Sun, Karthik Gurumurthy of Wicket, David Pollak of Lift, Andres Almiray author of several Groovy Builders, and a ton of other Bay Area coders and hackers.

Some of the session talks that I am most interested in attending include the following…

  • GridGain – Java Grid Computing Made Simple, Nikita Ivanov
  • JavaScript: The Good Parts, Douglas Crockford
  • Introduction to Building RIA with Adobe Flex and AIR, Abdelmonaim Reman
  • Introduction to Spring Web Services, Pyounguk Cho
  • Building Rich Applications with Groovy’s SwingBuilder, Andres Almiray
  • The Feel of Scala, Bill Venners
  • Rails powered by GlassFish, Arun Gupta
  • Ruby Meta-programming, Bala Paranj
  • Building Enterprise RIAs with Cairngorm Microarchitecture, Abdelmonaim Remani
  • Develop Rich Internet Applications using JavaFX, Sridhar Reddy
  • Flex and 3D UI, for games and more, Vic Cekvenich
  • Introduction to Grails, James Williams
  • Lift: a simply functional web framework, David Pollak

Technorati Tags: , , , , , , , , , , ,


Oct 27 2008

SQL Server Who Lock

When working with SQL Server, two procedures that I use from time to time is sp_who and sp_lock. The sp_who procedure provides information as to which loginame, hostname, dbname are for current users. Usually I am just interested the activity on a given user, which you can use the following SQL command.

sp_who @loginame = 'sa'

The sp_lock procedure reports on which sessions ids are locked in the database. There are different level of locks such as database, table, and data locks.

Technorati Tags: , , , , , ,


Oct 26 2008

The Rubyist: September Edition

Here is a recap of the top Ruby-related links for the month of September 2008. Links for The Rubyist are provided by A Rubyist Railstastic Adventure, a tumblelog.

Technorati Tags: , , , , , , , , ,


Oct 22 2008

Create Flash Animations with ActionScript 3 and Tweener

One of the kewl things about Flash is its vector graphic animation and tweening capabilities. Since I have been playing around with FlashDevelop to create ActionScript based graphics I thought it would be a nice idea to do some animations. The easiest way to create animations in Flash is to tween a graphic, so to speak, and the Tweener library make this incredibly easy that it is best to describe what tweening is by showing some code.

package
{
  import flash.display.Shape;
  import flash.display.Sprite;
  import flash.events.Event;
  import flash.text.TextField;
  import flash.text.TextFormat;
  import flash.text.TextFieldAutoSize;
  import caurina.transitions.*;

  public class Main extends Sprite
  {

    public function Main():void
    {
      if (stage) init();
      else addEventListener(Event.ADDED_TO_STAGE, init);
    }

    private function init(e:Event = null):void
    {
      removeEventListener(Event.ADDED_TO_STAGE, init);

      // Create a text field.
      var texty:TextField = new TextField();
      texty.text = "Holla, Tweener!";
      texty.autoSize = TextFieldAutoSize.CENTER;

      // Size and color the text field
      var textyFormat:TextFormat = new TextFormat();
      textyFormat.color = 0xFF00f0;
      textyFormat.size = 50;
      texty.setTextFormat(textyFormat);

      this.addChild(texty);

      // Animate the text field for 8 seconds
      // to move to the x, y coordinates
      Tweener.addTween(texty, {x:300,y:200, time:8, delay:0, alpha:0});
    }
  }
}

The code above is from the Main.as file that is created from FlashDevelop when you create a new ActionScript 3 project. I only modified the init function.

To actually build and run this code, you will first need to create an ActionScript 3 project in FlashDevelop. Also, download the Tweener AS3 library. After you unzip the Tweener code, copy the ActionScript source files to the src directory in the newly created project. At this point hitting F8 will build the project.

Technorati Tags: , , , , , , ,


Oct 20 2008

Develop Flash Applications with ActionScript and FlashDevelop

My abilities as an artist extends to drawing stick figures. Although this might be enough for internet comics such as xkcd, I always wanted to create complex geometric based artwork. I played around with Flash before, but I found many of the designer oriented concepts in the Flash authoring tool a bit to cumbersome for my programmer mindset. I didn’t want to start with a timeline, I wanted to start with a main method. Fortunately for programmers like me that want to dabble with Flash animations, Flash fully supports ActionScript, a programming language based on JavaScript. With Flash, I could write ActionScript programs that would create designs as precise as my programming abilities would dictate, not my drawing abilities. The only major drawback to using Flash, if it is not part of your job, is the is the price tag. The Flash CS4 authoring tool is priced well beyond my budget for Open Source projects, which is $0. Fortunately, FlashDevelop fits right between my price range.

FlashDevelop is a free and open source editor for Flex, Air, and ActionScript projects. FlashDevelop is a .NET project and has a look and feel similar to Visual Studio. To get started with FlashDevelop you will need to download the latest version of Flex SDK and FlashDevelop.

To configure FlashDevelop, you need to point to the location where you unzipped the Flex SDK. I typically unzip Open Source libraries under C:\OSDEV. Once FlashDevelop has been configured to point to the Flex SDK, you can create an ActionScript 3.0 project by going to Project | Create Project and selecting ActionScript 3.0 project from the project wizard.

FlashDevelop New Project

Creating a new project will create a project directory structure with a bin, lib, and src folders. Under the src folder there is an Main.as ActionScript file with the following scaffold code…

package
{
  import flash.display.Sprite;
  import flash.events.Event;

  /**
  * ...
  * @author DefaultUser (Tools -> Custom Arguments...)
  */
  public class Main extends Sprite
  {

    public function Main():void
    {
      if (stage) init();
      else addEventListener(Event.ADDED_TO_STAGE, init);
    }

    private function init(e:Event = null):void
    {
      removeEventListener(Event.ADDED_TO_STAGE, init);
      // entry point
    }
  }
}

Inside the init function, below the comment ‘entry point’ you can add your custom ActionScript code. For example, to create the standard ‘Hello, World!’ example you can add the following code.

      var texty:TextField = new TextField();
      texty.text = "Holla, World!";
      texty.textColor =  0xFF00f0;
      this.addChild(texty);

If you want to work with shapes here is an example to create a square and a circle.

      var shapely:Shape = new Shape();
      shapely.graphics.beginFill(0xFF0000);
      shapely.graphics.moveTo(0, 0);
      shapely.graphics.lineTo(100, 0);
      shapely.graphics.lineTo(100, 100);
      shapely.graphics.lineTo(0, 100);
      shapely.graphics.endFill();

      shapely.graphics.beginFill(0x00FF00);
      shapely.graphics.drawCircle(150, 150, 50);
      shapely.graphics.endFill();

      this.addChild(shapely);

Build the project and open launch the index.html file under the bin directory.

Technorati Tags: , , , , , , ,